How to add Glaxnimate vector graphics animations in Shotcut videos with new functionality in the latest version of the program
an update from
shotcut
for version 22.06.23 which presents a really interesting novelty, although quite difficult to metabolize. Those who haven't updated, or haven't installed this video editing program yet, can open the website of
shotcutaccess the link Click to downloadclose any advertising banner and click on install link in
GitHubGenericName
or fosshub.
A user of computer of Microsoft Will continue
windows installer if you have a computer 64 bit
with Windows 7 or higher. If he had a computer 32 bits it will click instead
older versions to download version installation link 19.12.31 going up Active. However, that user will not be able to install the latest versions and therefore will not be able to use the new features. In any case, you will have to double click on the file .exe.
Dialog boxes will follow to complete the installation of the program which will be presented in the language selected for the computer and therefore also in Italian. With the last version a synergy was introduced with the program
Glaxnimate
which will still need to be downloaded. It is a program
vector graphics
free, open source and installable on Windows, Mac and Linux. He comes in one stable version and in one
experimental. No installation required even though it weighs more than 200 MB. click in stable version.
Inside stable versions click on the link
windows zip to download a file zip weighing 205 MB. To extract the contents of
zip
I recommend the program 7-ZIP
(Install 7-ZIP) why continue Extract everything from
windows the process can get very long. after installing 7-zip items will be added to the context menu of the windows. With
Windows 11 right-click on the
zip so you choose
show other options to display the context menu of
Windows 10 what to climb
7-ZIP -> Extract the files in Glaxnimate. Files in a folder created locally will be extracted. Double click on it.
If there is another folder inside it, double-click again until the file is displayed glaxnimate.vbs
on which to double-click final. The program will not be installed, but its interface will be displayed directly.
posted on my
Youtube channel
a tutorial in which I explain how to use Glaxnimate with
shotcut.
GLAXNIMATE INSTALLATION
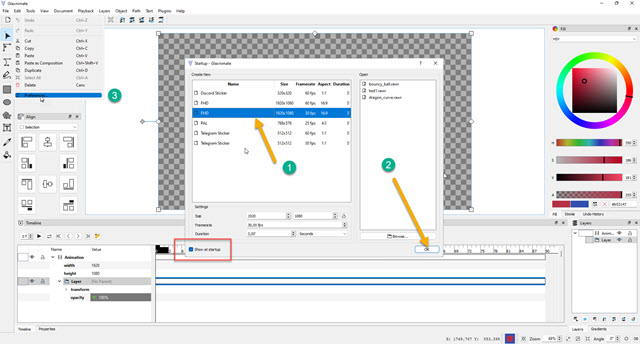
On first startup, a window will be displayed to define the
Definitions of the project we are going to carry out.
You can choose to always show this window or not by unchecking the option to show on startup.

If you are working on a video in HD you can, for example, choose the 1920 x 1080 pixels of resolution and
30fps of the frame rate. he goes up OK to see the desktop shown with lo
transparent background.
From English language you can move to this Italian going to the top menu Edit -> Preferences to then choose
Italian inside Language. I will not illustrate how to use this program that works on vector graphics
and not on that raster like the gimp AND
photoshop. Projects created with Glaxnimate
therefore, they do not lose quality if their resolution is increased. Before moving to shotcut you have to create one
empty project
with Glaxnimate.
To get an idea of what you can do with Glaxnimate
go to the portal menu at User manual and then read the sections
Introduction, Forms and Levels, Supported Formats, User Interface. Inside Examples you can see both projects
bouncy ball AND Dragon's Curve which can be downloaded from .rawr.
Leaving the desktop with the gray checkerboard pattern intact, you go upstairs. File -> Save Asyou choose one
output folderyou give a file name
then you go up To save to save a file in .RAWR.
ANIMATIONS IN SHOTCUT
he lets himself go shotcut. You enter
Playlist
and drag the video to the window of the same name. Then add to
Timeline
always with the help of the cursor. click in
+ Open More -> Animation (Glaxnimate).
You go out Transparent like the
background color and you define the duration
of animation. To make it last as long as the clip on
Timeline you can view the
seconds
It is frame. he goes up OK Open
file explorer.

You select the document in .RAWR that we first save with Glaxnimate and go up To save.
A window will open in which we will be informed that the file already exists. it continues Yes per substitute him. he will open
Glaxnimate and we will be able to visualize the interface with the
empty project that we had saved.
As a test video on Timeline there is that of a swimming shark. Let's see how with Glaxnimate you can add one Ellipse around the shark's head and follow him while he is swimming. The tool is then selected
Ellipse to the left. Inside tool options
check a Edge and take one
Filling.
On the right, the border color of the ellipse is selected with the palette, which is then drawn on the transparent sheet.

Below you will see the Timeline of the animation that in the specific case will be formed by 357 frames because the duration is 11 seconds and 27 frames and that the frame rate is
30fps. You go to the top menu File -> Save.
Charts created with Glaxnimate will be imported to
shotcut
and will appear in Source is at
To view.

However, graphics must be placed on top of the video. Then click on the menu Timeline and go up
Operation Track -> Add Video Track. Then click on Playlist and on the button
More positioned at the bottom left of the window. The clip present in the source will be added to the Playlist.
With the help of the cursor drag the clip from
Glaxnimate inside Trace placed above and you rise Property.

In the window Property the parameters set to will be displayed Glaxnimate. click in
To edit.
will open again Glaxnimate where you will see not only the ellipse but also the video below.

As the blue color of the ellipse mixes with the color of sea water, I entered Timeline about
Ellipse -> Edge and I double clicked
Color. A palette opened up for me where I chose another color and then went up first To apply and then
OK. If I go to the Touch the clip will play, but the ellipse will remain stationary.
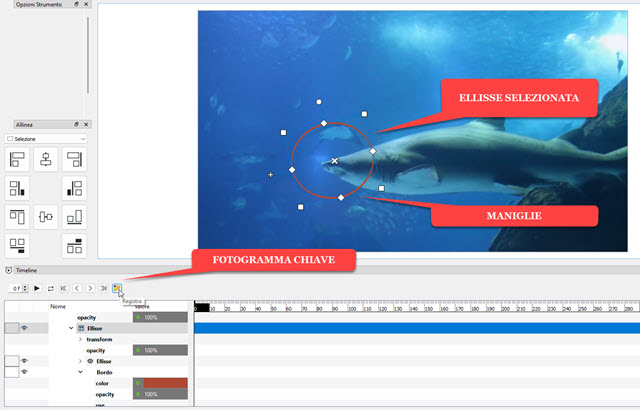
I then move the playhead to the first frame, click on the ellipse to select it, and act on the handles.

The ellipse can be rotated, resized and moved. It focuses on the head of the fish. Then click on the button
Record, the one on the extreme right, to correct the
frame
and essentially to add a
keyframe.
Then move the playhead forward, reposition the ellipse and move up again Record. The operation is repeated to add more keyframes until the last frame. The more you add, the better the result. We have to wait for the writing to disappear Frame recording in progress before creating a new one keyframe. When finished, click on
File -> Save or on the button
diskette
under the menu.

He reappears shotcutplay the
Timeline where now the ellipse will follow the movement of the fish's head. Obviously you get faster results if you create animations of 5 seconds or even less.
To save the video with the animation of Glaxnimate you go up
Exportyou go out Template inside
Presets -> Assortment
for a video on MP4 then you go up
export fileyou choose the
output folderyou give a first name for the video, you go up To save and the encoding completion percentage is displayed in the window Activities.
