Keep your voice pitch the same when changing the speed of a video with pitch compensation in Shotcut or pitch filter
When speeding up or slowing down a video, if the movie also contains audio, the audio will also be speeded up or slowed down by the same amount. As a result, the frequency of the audio will change and, in the case of speech, for example, there will be a very noticeable change in pitch. A video with a man's voice, if accelerated, will appear to have the voice of a woman or even a child. In case of slowdown, the voice will become so serious and cavernous that it cannot be assimilated to something real already heard.
With
Audacity
is possible through the effect change time compensate for the pitch change, but this is not an immediate operation, as you need to disconnect the audio,
change the weather with Audacity and then replace it with the original in the program used to change the movie speed.
However, we have already seen how
proceed in this direction
using in synergy Audacity with shotcut. However, this last program has a native functionality, the
tone filter, which allows us to compensate for a change in velocity with a symmetrical change in audio pitch. This will be the subject of this article.
shotcut
is a free and open source program supported by
Windows, Mac and Linux. he goes up
Click to download then choose the right link to download the installation file. a user Microsoft Will continue windows installer on one of two equivalent sites
fosshub
AND GitHubGenericName. A file will be downloaded .exe do in double click and then follow the
dialog box
to complete the software installation procedure.
I posted on Youtube channel
a tutorial for offset the bid if
change the speed of a video.
he lets himself go shotcut which should be displayed with the language set on your computer. If, on the other hand, you see it in English, you go to the top menu Settings -> Language and you choose
Italian and then restart the program.
click in Playlist and drag the video you want to operate on in the window of the same name and add it to the bottom of the
Timeline, always with the drag and drop of the cursor. Sometimes it may happen that the video is not added. In those rare cases, yes
select with one click and you go to the button
arrow pointing down.
Per change the speed from a video you will
Property in the menu or in
View -> Properties if your display has been disabled or still in the tab Property in the area ofPlaylist.
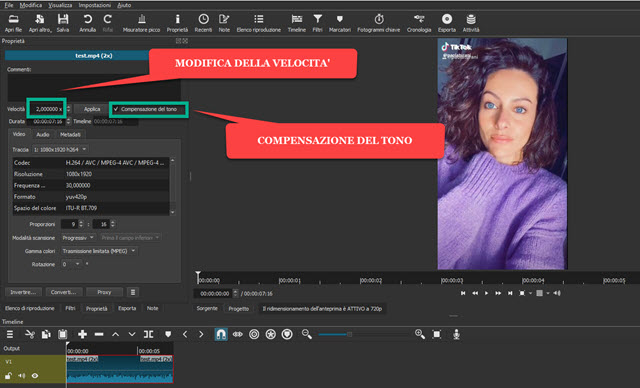
Hue shift due to video speed change can be compensated by audio tone filter but it's much simpler compensate you directly from
Property placing the appropriate check mark.

by default on Property the video speed is the original speed of 1.00x. If, for example, we select the numeric parameter and replace it with
2.00x so go up
To apply, the video duration will be halved while the audio frequency will be doubled. The reverse will happen if instead of
1.00x
We put 0.50x so go up
To apply.
The video will double in length and the audio frequency will drop by half, making it much more bass. If you play the video now, we'll hear the same words spoken
faster or slower depending on whether the video was sped up or slowed down. There
the audio pitch will change in the same way.
to keep you same tone of voice just check one tone compensation so go up
To apply. The speed of pronunciation of the words will remain respectively accelerated or decelerated, but the audio tone will be identical to the original. As a heuristic appendix, I would like to point out that it is also possible not to check a tone compensation and get the same result by applying the audio filter to the clip
Intonation.
at the cursor speed compensation present in its configuration window, just enter the same value applied to the speed of the video, be it accelerated or decelerated. Of course, the speed change can also be applied to just one clip of the video by selecting it after splitting the video into parts with the button split in playhead. Finally, to export the video with MP4, you go up
Exportyou choose Templateclick in export fileyou give a first name to the video, you choose the output folder and go up
To save
to then see the movie encoding progress in the window Activities top right corner.
