How to add a glow effect to a photo with GIMP, choose the number of frames and save it in GIF format by setting the duration of the frames
The expression shine it comes from cosmetics when very small aluminum foil and other metals with iridescent colors capable of reflecting light are added to the skin. A
shine
are usually added to products such as
lipstick, gloss, eyeshadow and nail polish. In a broad sense and by abuse of language the shinewhich in Italian can be translated as twinkleit has also become part of IT terminology.
We talk about effect shine applied to images when del is displayed in areas of them twinkle. An image must therefore be bright. be excited and it cannot be static because it would not glow.
There are several online sites that apply a glow effect
the images. On a
publish
four years ago I listed several online tools and some mobile apps to add shine to images and text.
In this article, I'll show you how to create an effect shine
with
gimpa free and open source graphics editing program that can be installed on
Windows, Mac and Linux. I claim that the result will not be sensational, but that it will still be appreciable. I will show you how
static image we can create one
animation with shine.
gimp
can be installed by clicking the button download to then choose our operating system and finally go to the button to
download gimp directly. a user
windows will download a file in .exe
on which you will have to double-click and follow the installation wizard dialogs.
posted on my
Youtube channel
a tutorial in which I explain how shine a photo with
GIMP.
How glitter image will be downloaded in gifformat that supports the
transparency
as alpha channelit is preferable to start from an image in
png maybe using a com
few colors like the ones in the comics.
However, the procedure I am about to illustrate will also work with images in JPG. he lets himself go gimp, click in
File -> Open then select the image of
shine
and continue You open inside
File Explorer (Windows OS).
You type Ctrl + Shift + J to fit the image to the working layout width of gimp. It goes down to the right Layer Panel Well, yes
duplicate the layer to create an adequate number of
frames.
to get a gif with 5 frames Duplicates the image layer to 4 times. The tool is then selected Diffusesimilar to
Photoshop magic wand. Clicking on an image pixel with this tool will
will select all adjacent pixels that have the same color
or in any case a very similar color.

To select multiple areas of the photo, tap tool options from
Diffuseyou must select the
Add to current selection mode. Such
Mode
can also be activated by clicking on the Change button.
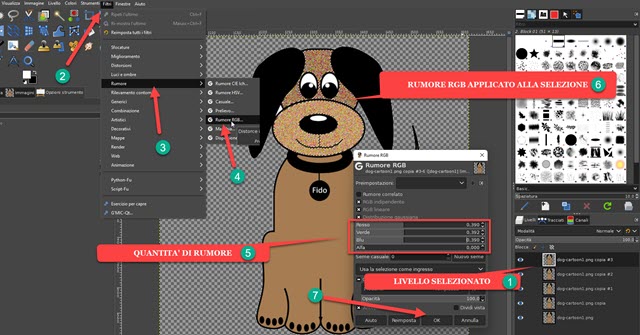
After choosing one or more areas, yes
select the highest level and go up
Filters -> Noise.

In the menu options you choose RGB noise open one configuration window of that noise.
The three primary color sliders move forward or backward
Red, green and blue and at the same time the selected image area will be displayed and take on a different appearance. he goes up
OK to apply it.
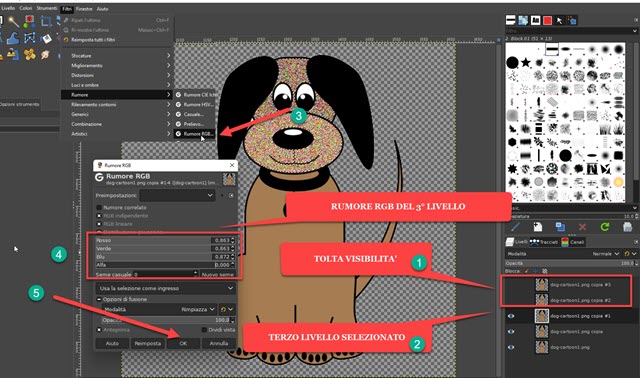
Click the top level eye icon to
remove your visibility and select the one immediately below. The operation is repeated up
Filters -> Noise -> RGB Noise and you define a
different level of noise before going up again OK. Therefore, the visibility is also removed from the
2nd level and we move on to the third and so on.

Then we add del RGB noise at each level caring vary the intensity. You can then give
visibility on all levels, keep going
Select -> Nonechoose the tool again
Diffuse
AND select another area of the image to which to apply RGB noise at each level have gods
shines in many areas without them being synchronized with each other. then go up
Filters -> Animation -> Execution.

Before doing this, you need to have given the
visibility at every level
that will behave like a animation frame.
A window will be shown in which to go to the button
Touch per throw the gif.
You don't need to change the animation speed because you can do that when exporting the gif.

At the bottom of the preview window, you can optionally change the frame rateby default set to
10 fps, and playback speed. If we are satisfied, we close the window and export the gif.
Then click on File -> Export As..., you select the output folderyou give a file name
exported including the extension GIF, for example
animation with glitter.gifand keeps going Export.

A new window will open in which you need to check
like an animation
it's at perennial cycle do
play the GIF indefinitely. Lower you can set the duration of each frame in
milliseconds.
finally goes up Export in the 2nd window and then open the
gif with the default program by double-clicking.
