How to create a mask with Glaxnimate that adapts to area movement during playback to show a video in one area of another
This is the third post I dedicate to the synergy between
shotcut, video editor very simple and
Glaxnimateportable program vector graphics. In the first we saw how add animations
to the videos and in the second how
draw a mask
through a polygon. In the second post the mask was made on top of a jpg image therefore remained unchanged throughout the
movie playback.
In this third post I will deepen this last topic showing how the mask can also be drawn in a video with
the area that is then changed during movie playback. in fact in Glaxnimate there is the function
Write (Write) similar to that of
keyframes already seen in shotcut AND
da vinci resolves.
To go down Glaxnimate click on the page linked at the beginning of the post and go to stable version. An owner of a Microsoft PC will click on the link
windows zip to download a file zip which he will then have to unzip with the same windows going up
extract all
or with
7-ZIP. In the folder that will be generated with the content of the
ZIP, Double click on the file glaxnimate.vbs
which will automatically open the program interface.
before you can use Glaxnimate with
shot cut,
even an empty project must be saved by going to
File -> Save As to then give a first namechoose the destiny from the same folder as
Glaxnimate
and continue To save.
shotcut
is supported by windows, mac AND
Linux
and for its installation we go up Click to downloadthe advertising banner is closed and click on
windows installer on one of two websites
fosshub AND GitHubGenericName.
A file in the format will be downloaded .exe which to double-click and follow the dialogs to complete the installation. posted on my Youtube channel
a tutorial to create motorcycle masks with Glaxnimate.
he lets himself go shotcut is at
Playlist drag and drop the two videos you want to operate on. The first will be the background on which we will have to draw the mask, while the second will be displayed inside the mask itself.
The video to be displayed in the mask is dragged to the
Timeline then click on the same menu, go up
Operation Track -> Add Video Track on which to drag the second video on which to place the mask.
The video on which to draw the mask must be placed on top of the other and the two films must be equalized in length. You select the video above with a click and then go up Filters and click the button More.
In the card Video you click on it
Mask: Draw (Glaxnimate). The configuration window will open.

Click on one of the two buttons New or
You open
then select the empty project file saved with Glaxnimate in format .RAWR. Let's display a window to go Yes per
replace the file.
It will automatically open Glaxnimate where we will also display the video to apply the mask to. You make sure the playhead is positioned at the first frame of the movie. The tool is selected Draw the Bézier curve on the left, then trace the polygon in the area where you want to show the video below.
For each click one at the. In the present case, there will only be 4 clicks to create a quadrilateral. The last click will occur above the first to create an outline. Can you help us with this? Enlargement activated by moving the mouse wheel forward while holding down Ctrl. To move the screen, you press on the same wheel.

After completing the follow-up click in
Filling to open the palette in which to set the color #FFFFFF i.e. the
White and continue OK. The mask drawn with the mouse will then be colored by white.
If we go down Touch however, this mask will only work for the first frame. To change the mask during video playback, click the tool To edit who will show me us of the polygon.
Click on the button Record and moves the playhead forward. With the cursor you move the nodes to adapt the mask to the new position and size of the area. then go up again Record.

A series of
keyframe
which will adapt the shape of the mask when playing the video. Of course, the greater the number of these keyframes
and better the end result.
In certain circumstances it may be necessary
add a new node those already present. You then go to the menu.

click in Path -> Add node click on the contour where you want to add it, then move it as desired.
When we got to the last frame of the Timeline click in Touch to check if the result is good.

If not, we can still create others keyframe
adjusting the nodes and then going up Record. When we are satisfied we go up File -> Save. At this point, we can also close the Glaxnimate.
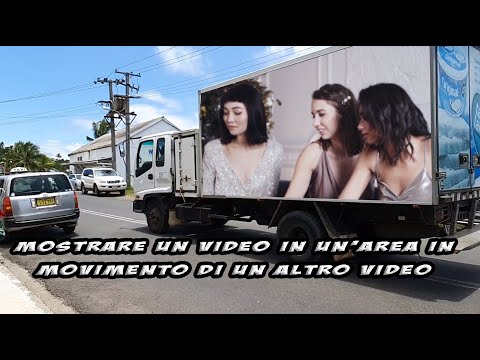
We then went back up shotcut where you will see the mask that was created, but that will be on the contrary. In the sense of hiding what should be displayed and showing what should be hidden.

Always with the same clip selected you go up Filtersyou choose me video filters and click on it
Alpha Channel: Adjust. This will open your configuration window to go to Inverted to flip the viewfinder.
The overlay clip will appear with the underlying clip inside the mask you drew.

If the area where the video is displayed changes significantly in size, it is necessary to act on the clip that should be selected with one click. O Video filter size, position and rotation. The video will be shown with four corner handles and a center point with which to resize and reposition the canvas.
We start from the first frame, apply i
keyframe then the
Playhead and you act on the screen again to adapt it to the new position and size of the mask.
The video preview is played to check the result. Optionally, the
Exponential blur filter to show the video in a not very clear way in the mask. To save the result, go to
Export, you select Template to a file MP4 then click on export fileyou choose the output folderyou give a first name for the video, you go up To save and wait for the end of the encoding shown in the window Activities.