
Example predefined table.
In this lab we will see a simple example showing how to use the DataTable component, this element allows us to link a data table to our page like this:

For this first example, only the prepopulated component will be linked from our bean class, later it will show how to manipulate its information dynamically.
Initially, let's create a JSF project with the following structure:

As we can see, 2 java classes are created, one corresponds to the person class that allows us to process the people that we are going to show in our table and the other to the bean that will allow us to manage our table with the respective columns and records.
The Person.java class provides us with the basic data of the person that we are going to show in the table, here we add the corresponding set and get methods, as well as a constructor with parameters to populate people directly.

The TablaBean.java class refers to the table and the management of people in it, the records that are displayed are stored in the ArrayList person type which, for the purpose of this guide, is filled in the constructor.

In index.xhtml we create the DataTable component to which we associate the list of people directly in the value and in the respective columns the attributes of the bean that is referenced in var="data", being data the element that represents the data of the Person object in each line from the table.

When running it we will have something like this

As we can see, the information is presented in table mode, as we have not yet linked the CSS styles, we only appreciate the structure in rows and columns without any kind of design, however we can add a “border” property to the table and a margin having something like this:

Finally we know that we can make use of

Data management example in DataTable.
In this section we will continue with the previous example where we will see how to manipulate table data to carry out common processes such as registering, modifying or deleting information.
Add people.
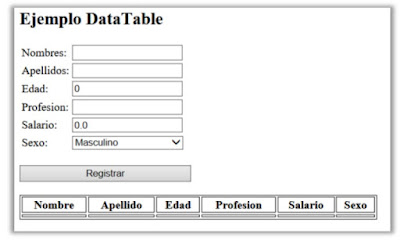
To register people, we will modify our index.xhtml page to which we will link the person registration form. We do this by linking the input and selection components in a grid panel duly associated with the “myPerson” object to which the different data are sent. a new person is registered in our system.

As we see these new elements are added before the DataTable getting a result like this:

After modifying the index, let's make the necessary changes in the TableBean.java class, because in this example we will continue using the default scope level, so let's make the list of people static so that it can be manipulated without problems, we will additionally eliminate the list padding since the idea is to be able to register people through a registration form.

As we can see when defining the list as static we create its instance at the class level, we do not do this in the constructor as this will be called on different occasions by our jsf which would cause a new instance of the list which would cause us to lose the information it could contain.
Additionally, we added a Person-type object to be able to manage the registration data and added the “aggregarPersona()” method that allows adding a new element to the list and is called from the jsf button, later we generate a new instance of the “minhaPersona” object which will allow the cleaning of the registration form.
When running the system we will see the following behavior:
Initially the form is empty and the header of our table is also displayed but without any content (remember that we eliminated the filling in the list), so that the header does not show when there are no people registered yet, so we use the “rendered” property where we validate that the length of the list is greater than zero, otherwise it shouldn't show the headers. (The operation of this property will be discussed in detail later)

As we add people, they are stored in the list and presented in the DataTable

Exclude People.
After we have successfully registered people in our list, we can remove them from it, for this we will add a new column of actions in our dataTable that will contain a link to the method “eliminarPerson()” that we will create in our bean
For this we modify the index.xhtml where after the column “Sex” we will add the column “Actions”

As we can see, we use a component
Later, in the TablaBean.java class, we add the “eliminarPersona()” method that receives as a parameter the person object that we want to delete, this corresponds to the “data” that we send from the jsf, and is equivalent to the person in the line that we want to delete, so then remove it from the list.

When running the system we will have the following:

And every time we delete a record through the corresponding link, the table will be updated

Edit People.
After having successfully registered and deleted people from our list, we can modify them, for that we will modify our table making it editable when we want to update some of the data, for that we will use the “rendered” property again that will show or hide the options editable depending on what the user decides.

As we can see in each of the columns, a component is added
In our case “data.edit” makes a call to a boolean variable (edit) that we added in the Person class, if the property is true then it will show the
The same must be done for the profession, salary and sex columns respectively, where instead of adding a

Likewise, the rendered property is bound to show the combo or show the label as the case may be.
Subsequently, the “Actions” column is modified where before we had only a link to “Delete” now we will add 2 more links, one to “edit” and the other to “save” the information after editing it.

As we can see, now there are 3 links for the edit, save and delete methods respectively, however edit and save have the rendered property which makes only 2 of the 3 links visible at a time (remember that the rendered one contains true or false depending on condition ) so by default the delete link will always appear as it doesn't have the rendered property, while edit and save will never be seen together. (allows you to add a space between links)
Internally at the graphic level, the dataTable would look like this:

Although graphically you can see all the components together, it's important to make it very clear that the rendered property will only show the components depending on the true or false value at the time.
After modifying the index.xhtml, now it's time to modify the Person.java class, in which the “edit” property used by the rendering mentioned above is added.

As we can see, a new boolean attribute is linked to its respective set and get. Also, to fit the structure of the exercise, we added the property to the parameterized constructor, although it is no longer used at this point in the exercise.
This way, every time rendered=”#{data.edit}” is done in index.xhtml, it would be calling this variable, which would allow showing or hiding components depending on the case.
Finally, and already with the previous alterations, we proceed to modify the Bean class where we must add the corresponding methods for deleting and saving that are called from the “Actions” field.

As we can see, the editPersona() method receives a person object (from the jsf call, just as it is done in the delete method) and its “edit” property is modified by sending it the value true, which will allow this record to hide the
On the other hand, the savePersona() method will be responsible for changing each “edit” property of all objects in the list to false so that the dataTable is restored with the values of the people and not with the editable elements.
When running the system we will have the following:

And when pressing edit the system changes to:

As can be seen, when the edit link is clicked, the editable components are automatically shown while the non-editable ones are hidden, likewise the edit link disappears to make way for the save link as explained above.
And ready!!!
On my blog and on my channel I have been sharing material about this great programming language, you can find many articles and videos from scratchI show you how to download the necessary tools to start programming, we go up more and more through the basic concepts, going through the object-oriented programming conceptsstandards, topicsdata structures, access to databases among others, to the construction applications with user interfaces.
Also you can find a course from scratch where I teach how to create mobile apps on android through a step-by-step video sequence that is constantly updated.
And now I'll also start the sequence from scratch where we'll enter the world of java Enterprise edition, show you how to set up the development environment and how to create your first web applications with java.
That's why I invite you to visit codejavu.blogspot.com, to visit my channel Cristian Henao and that they are very aware of the new sequels
It may also interest you.
Is there anything you want to add or comment about this entry? feel free to do….and if you liked it, I invite you to share it y Subscribe by clicking on the “Join this site” button to hear more posts like this one 😉