How to Create Comic Speech Bubbles with Gimp for Talking and Thinking Characters, How to Add the Border and How to Export them in PNG Format
In this article I will go deeper into the subject of comics already discussed previously in a
publish where I showed you how to create them
rectangular with rounded and elliptical edges adding a tail to indicate who the text within them refers to. In the comics, however, there is no
spoken dialogues but also undisclosed thoughts.
It is common for all designers to indicate intended and unspoken texts with words clouds that instead of the tail that indicates the character speaking, some are inserted bubbles meaning the text inside the bubble is only thought and not spoken. In this post, I will show you how to create
clouds
irregular shape, how to add a edgehow to create character speech bubbles thought and how to add them to photos or drawings.
To make the clouds is used
gimpfree and open source program that can be installed on
Windows, Mac and Linux. Those who still don't have it on their computer can open the home page of gimp
and click the button
Download [version number]. At the time of writing, the most recent version is
2.10.30.
On the next page you choose the operating system and then click on the button Download Gimp Directly. a user
windows going to download a file .exe to double-click and follow the installation wizard dialogs. After opening the program, you can
customize the appearance according to our needs.
posted on my
Youtube channel
a tutorial explaining how create speech bubbles for comics.
he lets himself go gimp then you go up
File -> Newyou choose the project size (e.g.
1920x1080px), Click in + advanced options is at
fill with you choose White so go up OK.
To adapt the paper size to that of the layout, you can type the key combination Ctrl + Shift + J. You then go to the top menu
Layer -> Transparency -> Add Alpha Channel to add the transparency.
in the window of Instruments you choose from
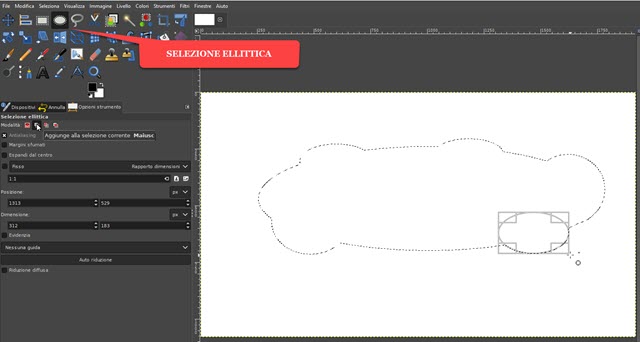
elliptical selection and draw an ellipse on the sheet. Before using the slider you need to check that the options are not checked
Fixed AND Expand from the center but instead that the Mode Add to current selection. Then others are created ellipses to intersect the first.

Since we chose the
how to add selection to selectionwill create a cloud shaped selection with the new smaller ellipses added on the edges of the larger one. This is already a cloud, but it needs one tail to indicate the
character pronouncing the text it contains.
you select it path tool in the window above or by typing B. on the keyboard. Make sure the option is selected Projects and click inside the speech bubble at the point where you want to insert the tail.
Then you make another click outside the cloud and then a third click, this time inside. We then proceed to edit mode and click on the first point to complete the three sides of the triangle. With drag and drop, you can curve both sides of the triangle as you go up.
move it can be moved to the white sheet.

This new route must be added to the existing one. click in
path selection holding the key
Change then you go to top menu
Selection -> To Path. The speech bubble with the tail will appear.
The selected part is the one internal. You then go to the top menu
Select -> Invert to select that
external.

Then continue Canc on the keyboard to
remove the outer part of the white sheet and leave the
unique speech bubble. The operation is completed by rising
move
right away Select -> None to deselect the speech bubble.
It can then be saved to png going up
File -> Export As...,
you choose the output folderyou give a first name for the file including the extension pngfor example speech bubble.pngso go up Export twice.
The speech bubble with the tail to the left you can easily turn it into one with the tail to the right. you select it
reflection tool (Shift + F.), check a Horizontal then
click on the speech bubble.
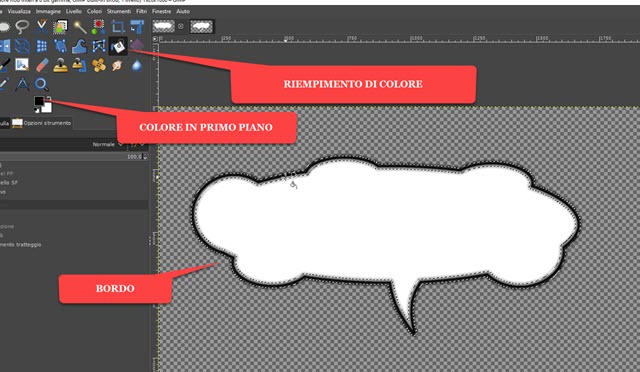
So you might as well save a speech bubble with the tail pointing outwards. Comics can also be colored differently. Just select the tool Diffuseclick on the speech bubble to select it, choose the foreground color to color, select the tool color fill and click on it.
CREATING CLOUDS FOR THOUGHT
to create the clouds of characters who are thinking queues are not added, but gods decreasing size circles. Create the white project as before, add the
alpha channel
It is like elliptical selection the bubble is created by adding other selections. Always with the same
elliptical selection they are drawn out of the cloud i decreasing size circles which will be selected automatically.
then continue as before Select -> Invert to select the outside of the speech bubble and then move up Canc.

The outside part of the speech bubble will be deleted and can be saved to png going up
File -> Export As… and following the instructions already indicated. You can then continue reflection tool per
has the circles pointing to the opposite side. You can also add gods to all clouds edges.
HOW TO ADD A BORDER TO CLOUDS
The procedure is the same for speech bubbles and thought bubbles, although with the latter you can add a different border to the outer circles of the main bubble. For detailed instructions, see the video embedded in the post. On the tab of a speech bubble, you check that it has the border with the selection reason.
If not, continue fuzzy tool and click on it. You then go to the top menu Select -> Edge.

In the window that opens you define the dimension of the border, then choose the style between Clean, rounded and tinted. We follow then OK. A will appear in the outline of the speech bubble internal and external selection.
you choose the color edge, you select the tool
color fill and click on the border to color it.

The border color will be the one chosen for the one in
First floor. so continue
Select -> None
to uncheck. Speech bubbles can be saved and added to photos and drawings. Photos, drawings and clouds must have been opened
gimp. Each file will have a tab. You go to the cloud and type Ctrl + C..
Then go to photo or drawing tab and type Ctrl +
v. by to paste speech bubble. You choose the tool Ladderclick on the speech bubble, yes
resize
AND Replacement then go to the button Ladder.
He will create a floating selection in the window of Levels. Right click on it and choose still on the level to uncheck everything. Proceed in the same way to add other clouds.
Click on the tool Text, you choose the font family, size, and color, and type text inside the speech bubble. You can select it by clicking on it and typing Ctrl +
TO and then adjust the size.
You can add more speech bubbles in the same way and type more text. Click on the image layer to deselect it while you can move up move per put it on at best inside the cloud.

To unify all layers, you can right-click on the bottom one and then move up
Merge Visible Layers -> Merge. The photo or drawing with speech bubbles and text can be saved in JPG going up File -> Export As. I carried
dropbox the bubbles created for the post for download at
zip
from this link.
