How to Draw a Mask on a Shotcut Video Clip to Show an Area Below with Glaxnimate Portable Vector Graphics Software
In the last update of
shotcut
for version 22.06.23 a very interesting synergy with the open source program has been added
Glaxnimate
from Vector graphics. The latter is a program supported by windows, mac AND Linux than in the case of the first ONLY It doesn't even need installation because it's portable.
It is distributed in a stable and experimental version. Users of windows they have to go up download in the menu and click on the link Windows Zip which will allow us to download in file zip However 200MB. To extract its contents, you can right-click on the file
zip and then continue
Extract All -> Extract or use the free program
7-ZIP
which is much faster in extracting files.
shotcut
instead, you get it for free by hitting the button
Click to download. After closing the banner, a computer user
Microsoft will click windows installer on one of two mirror sites fosshub AND GitHubGenericName. A file will be downloaded .exe which you double-click to complete the installation.
Through the interaction between shotcut AND
Glaxnimate we have already seen how
add animation
to videos. In this post we will see how draw a mask
to see an area from the clip below.
As a demonstration, I will show you how to draw a mask on a JPG image but you can also do this with a
video and I believe this will be the topic of a future article if I see that the topic arouses any interest.
posted on my Youtube channel
a guide in which I explain how to draw the mask with
Glaxnimate.
Of course you need to have it installed on our computer
shotcut and have a folder with the contents of the zip downloaded from Glaxnimate. As we have already seen in the first post dedicated to the synergy between
shotcut AND Glaxnimate he needs to come
saved a project, also empty, of this vector graphics program.
The folder with the files opens Glaxnimate and double click on the file
glaxnimate.vbs. The program will open and show us a modal window to choose
resolution and frame rate from the project. This window can continue to be seen every time we open the program or avoid it by unchecking the window itself.
In any case, the initial settings can still be recovered by going to File -> New from Template. When clicking
Edit -> Preferences the home window can be restored and the language selected Italian.
To be used Glaxnimate synergistically with
shotcut
necessary save a project which can also be
empty. Then open Glaxnimate and go up
File -> Save As then choose one first name
and continue To save.
Finally he lets go shotcut and go up
Playlist where in this demonstration we care about the mouse drag and drop a video and an image of a door, not fully open, that will form the mask.
Again with the help of the cursor you drag the video to the
Timeline then you go to the top menu
Operation Track -> Add Video Track to create a strip above where you can drag the image and then equalize it
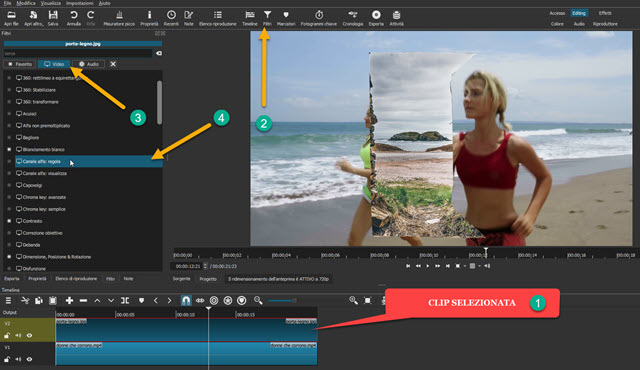
duration with the video. You select the image clip and then go up Filters and click the button
More.

From the filters present you can choose those from the card Video and scroll down to this
Mask: draw (Glaxnimate) to open the relevant window. Then click New or up
You open
Well, yes select the file in format RAWR which we saved as a blank document Glaxnimate. The interface of this program will open.

Before displaying the interface Glaxnimate you have to click Yes in the dialog box to replace the file.
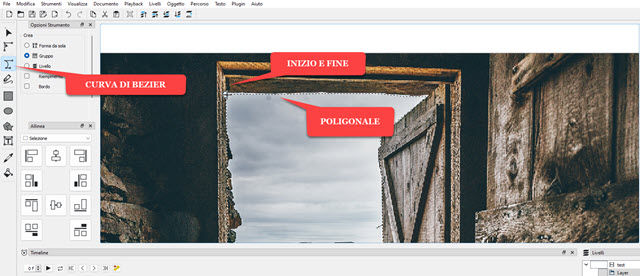
In the interface shotcut the video below the image will be displayed while the same image will be displayed on the desktop of Glaxnimate. The next step will consist of mask creation.
You choose the tool Draw the Bézier curve and draw a
polygonal in the picture. Basically you click when you need to change direction to create a node. To be more precise, you can
Zoom in
pressing Ctrl and rolling the mouse wheel forward while stopping play the image is held down on the same wheel.

To complete the contour of the mask you must
click about first node that we created. We must now color the outline created with the polygon. click in Filling to open the
color palette
to type #FFFFFF to choose this White and then continue OK. The mask will turn white.

To highlight the mask in detail, it is always used
change
and that enlargement as stated above, but the tool is selected To edit. In the sketch they will come
all nodes displayed created with our clicks.
Always using the cursor we can drag them to better adapt the mask to the affected area.

If they were other necessary nodesyou go to the top menu
Path -> Add node and click the path point to add it. Once you have perfected the mask, you go up File -> Save or up Ctrl + S..
After doing this it closes Glaxnimate and move on
shotcut where the
video with the mask.

However, the mask will show the outlined part of the image. Instead, we want to do the opposite, that is, view the outside of the mask and display the video below from the inside. The image clip is selected.
still rises Filtersclick in
Moreyou select the filters He sawor and you choose that
Alpha channel: rule.

In the settings of this filter you just check
Inverted. The area of the image that was previously hidden is now shown while the one that was previously seen is now hidden and you can see the video below.
You can finish this way and export the video, but to always display the movie subject in the mask area, you can
add a filterthis time in
video trackand apply i
keyframes.
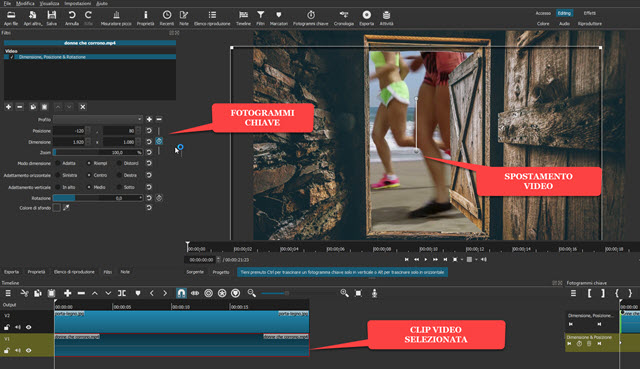
You then select the video clip with one click you go up
Filtersthen press the button More and in the filters Video you choose the one
Size, Position and Rotation. You move the Playhead at the beginning of the video.

With the central point yes move the video screen to center the subject inside the door. Then click the button to activate the keyframes, limited to the position, which will become light blue color. Movements
then the playhead forward Well, yes
Replacement video.
A new one will then be created keyframe and its succession will be visible in the lower right part of the relative
Timeline. Still moving forward
Playhead
to create a third keyframe, and so on until you reach the clip file. More keyframes the better the result will be.
You go to the button Touch below the preview to view the final result. Once we are satisfied, we save the video by continuing Export. You go out Template inside
Presets -> Assortment for a video on
MP4.
Then click on export file Open
file explorer in which to choose the
output foldertake a file name and continue To save. The percentage completed of the encryption process will be shown in the window Activities.
