Change the color of the eye iris with Gimp and the Elliptical Marquee and Freehand tools, using Hue and Saturation in Colors
With graphic editors it is possible to change the color of an area of a photo in a not very complicated way. The biggest difficulty is selecting the contour of the one you want to modify. As far as changing eye color is concerned, we have already seen how to proceed with some
online tools
specially created.
Of course also with
photoshop
you can change the color of the eye iris. In this article we will see how to proceed with
gimpfree, open source and installable on
Windows, Mac and Linux. Who hasn't yet
gimp
on the computer, he can open the newly linked home and go to
Download [version number].
At the time of writing this post, the latest version is
2.10.30. After clicking the button, another page will open where you can choose the
operational system so go up
Download Gimp Directly.
a user windows will download a file in
.exe which you double-click and follow the installation wizard dialogs. I remember the interface
gimp
could it be
custom
in many of its components.
This is especially necessary if you are used to having
a colorful interface
which by default is not. The selection of eyes is done in the first instance with the tool elliptical selection and secondly with the freehand selection which will allow us to eliminate the part of the iris hidden by the eyelid.
I posted on Youtube channel
a tutorial that illustrates the steps to change the color of the eye iris.
he lets himself go gimp then click on the menu
File -> OpenSelect the photo you want to operate on from PC, and if it doesn't open automatically, go to To convert in the pop-up to adapt the photo's color profile to that of
gimp.
Roll the mouse wheel forward while holding down Ctrl for
Zoom in and keep an eye on the foreground. Click on the tool elliptical selection. On the panel
Tool options, visible below, check a Fixed and you establish a relationship 1: 1 draw one perfect circle so the option is also flagged Expand from the center to design. Click with the cursor on center of the eye then move it out to contain the entire iris. You can adapt the selection by moving its corners and sides.
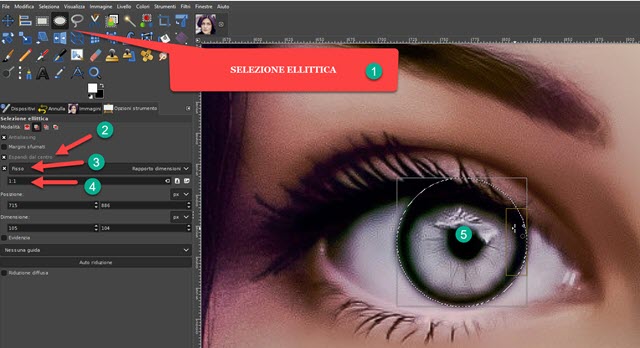
The circular selection will also include a portion of the cap that should not change color.
Then click on the tool
Freehand selection
which is the consideration of Link from
photoshop. Inside tool options you select the Subtract from current selection mode and then draw on the circular selection part to be deleted. This is the eyelid that covers part of the iris. Click on the starting point, draw with the cursor and return to the point where you started to complete the outline to go up Enter.
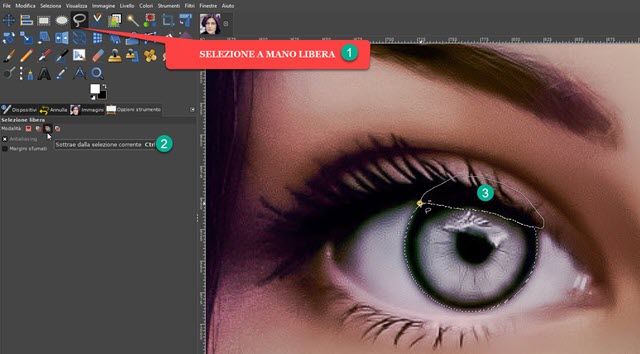
You can also operate more subtractions of selection if we went beyond the iris and also selected some of the white of the eye. You then move the image with the two vertical and horizontal sliders to
see the second eye in the foreground. In the instruments we chose again the one of
elliptical selection.
We leave the previous settings, but this time, however, in
Tool options, we chose
Adds to current selection in order of
do not delete the selection which we have already completed in the first eye.
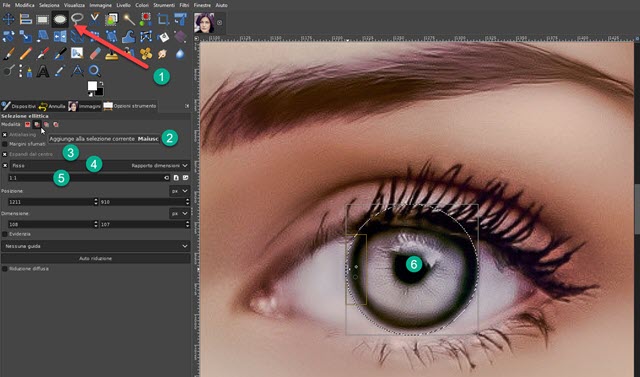
After drawing the selection around the iris and adjusting it with the handles, let's move on to the
Freehand selection as
Subtract from Current Selection Mode. You can then
deselect the part of the circle that is above the eyelid
and retouch parts of the selection outside the iris.
An outline is created with an initial click and a second click, always on the first to locate the selection and then go up Enter. At the end you type Ctrl + Shift + J to view the complete layout image.
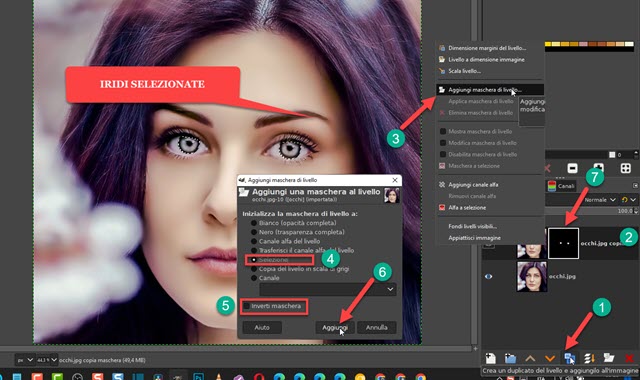
In the dashboard Levels he goes down
Duplicate Layer, you select the level of
copy of then click on it with the right mouse button and, in the menu that opens above it, go up Add a layer mask. A window will open where you can check a
Selectioncheck that the option is not marked
Invert mask so go up to add. will be added black thumbnail with two
white dots at the selected level.
If the two white dots for the eyes are not clearly visible, you can go to the small downward-pointing arrow to the right of the eye guides. Panel so go up
Preview Size -> Extra Large.
You then go to the top menu Select -> None per
clean the irises From the eyes. You select the thumbnail of the image on the copied layer (not the black one). You then go to the top menu Colors -> Hue Saturation.
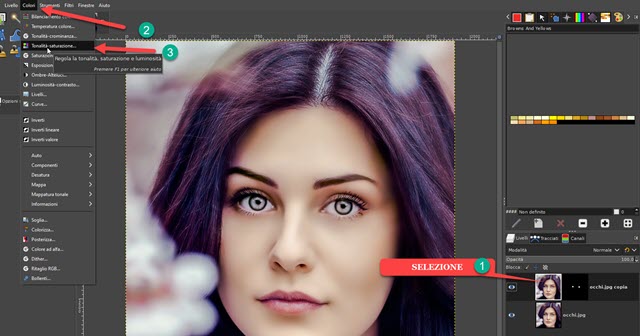
A window will open with sliders to define color changes that will be applied to selections only.
You can select the button Director to change the parameters of all colors at the same time.

Alternatively, you can select the primary color
C, B, M, R, Y and G. and then act on the three cursors
Hue, Brightness and Saturation. Before I go up
OK
you can try to choose Merge Options.
All mixing options including
Multiply, Burn, Only Dark, Only Lightetc…

Choosing the right mode is important when you want to switch between
dark eyes to light eyes and vice versa.
he goes up OK to apply the iris color change and save the result. Right click on the original level and go up Merge Visible Layers -> Merge. Then click on File -> Export As..., you select the folder resultyou give a first name for the file, click Export and again in Export
in the next window.
