How to create full and empty text, how to quadruple and distort transparent or on a colored background with the Distort with Swirl and Pinch filter
gimp
it is the best free program among alternatives to expensive ones
photoshop. Can be installed on
Windows, Mac and Linux and it is open source. It doesn't get updated very often, but that's also a plus because it's very stable and reliable.
gimp
can be installed by clicking on
Download [version number] then choose the link of your operating system and go to the button
Download Gimp Directly.
At the time of writing this post, the latest version is
2.10.30. a user windows will download a file in .exe which to double-click and follow the dialog boxes to complete the installation.
In a previous article I showed you how to create a referred text
see only the border
while the inside of the characters remains transparent. In this guide, I'll show you how to create a distorted text On the same line.
It is not a difficult procedure, but it is quite long, so in the text I will necessarily have to be concise, even if detailed, so I have forwarded the visual guide that you can follow by consulting the video embedded below.
actually I posted on my
Youtube channel
a tutorial in which I explain how to create distorted text ton upon ton.
he lets himself go gimp then you go up
Windows -> Dockers -> Palettes. The default settings gimp they will usually be shown in the top right panel. Among the palettes we choose the one with the colors we like the most. Palettes can also be modified, but I won't dwell on that.
In my test I chose the palette browns and yellows with
22 colors. Double-click them to view them in another tab on the same panel. Click on one of the darker colors. After clicking, this color will be captured by the color in
First floor in the palette under the tools. Now let's create a project.
he goes up File -> New to display the configuration window. The default dimensions are left (1920x1080px) and click on + advanced options. Inside
fill with you choose foreground color and go up OK.
In the center of the layout of gimp there will therefore be a
color sheet set in palettes. You type the key combination Ctrl + Shift + J to adapt the dimensions of the project to those of the layout
Gimp.
You return to the palette tab browns and yellows and you choose one Lighter color which will be assumed by the one in
First floor. You select the tool
Text (T. on the keyboard) and choose the font family (for example, condensed impact) and a suitable size (for example, 100 pixels) and click on the project.
Enter text, click inside and type
Ctrl + PARA to select it. Selection involves displaying vertical bars interspersed with text characters. Acts on the arrow of the dimension.

A new one will be created Level which will take the name of the typed text. Make sure this level is selected and go to the tool move. With the cursor you drag the text to the upper limit of the project.
He enters Layer Panel , and with the text layer selected, click 3 times about
Create a duplicate of the layer. will then be created
in total 4 copies of the text layer. The highest is selected.
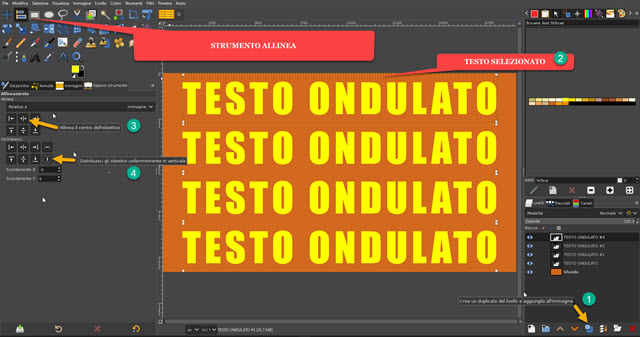
Then click on the Align tool (Q on the keyboard). Inside
tool options you choose Image inside
Related to. With the cursor you draw a
rectangle around text to select your box.
So you go first Align to the center of the lens right away Distribute goals evenly vertically. The text you enter will then be
added for the entire vertical length from the project.

With the text and design size chosen, four lines of the text we set up with the layer duplicates should fit. You select the text layer in place lower then you go up Create a new layer.
In the window that opens you give the level a name, you choose
Transparency inside fill with and go up
OK. Now select the underlying text layer and click on it with the right mouse button. In the context menu that opens you choose
alpha to selection This one
will select all text borders. You then go to the tab Ways which is to the right of
Levels. If not, go up
Windows -> Dockable Panels -> Paths.
click in path selection to add a
Selection In the card. Now go up
Select -> None to deselect the border of the text. back to Layer Panel and select the added transparent.
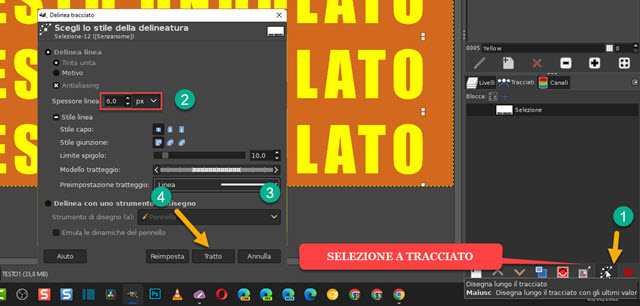
We follow then Ways and click on
Draw along the way. In the window that opens, you define the size of the border (for example, 6 pixel) and you choose Line inside Sile Line then you go up Treatment.

The characters will be enlarged in the
edge measurement defined in all directions. back to top
Levels.
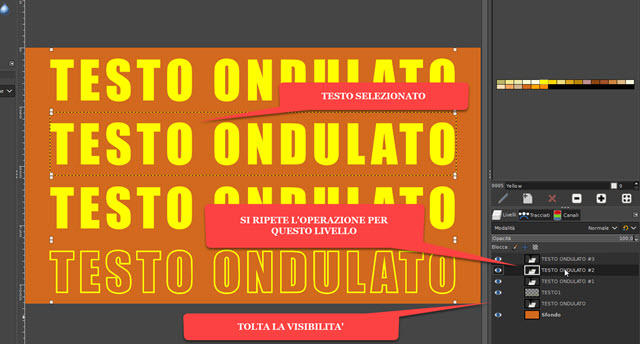
Click the eye next to the underlying text layer to remove its visibility. Only the text border will remain.

The same procedure is repeated on the 2nd copy of the layer to alternate full and empty texts with only the border.
You remove the visibility of the second text so that only the border is visible, and then you also remove it from the background.
With the highest level selected, you go to the top menu
Layer -> New from Visible to add it.

At this point, we can proceed in two ways. The first is to leave visibility only at the level Visible.
so continue
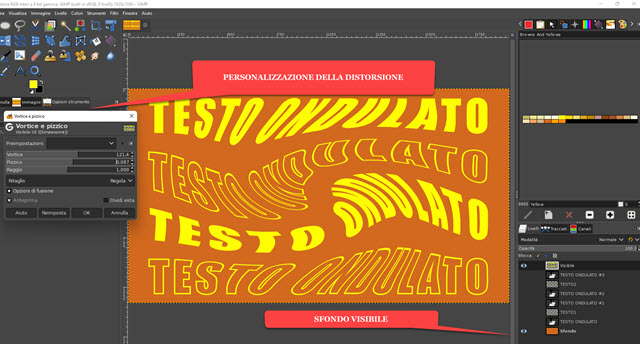
Filters -> Distortions -> Swirl and Pinch to open the filter configuration window.

There will be a distortion of the four lines of text that can be customized by acting on the cursors
Vortex, Pinch and Lightning. he goes up OK after choosing to export the image to png with
transparent background.
If beyond Visible We also give visibility to
Bottom
and then applying the same filter we will have this result.

After customizing the distortion we can
save the result in JPG. he goes up
File -> Export As to open the configuration window. you choose the output folderyou give a
name for the image including the
extension
(for example:
transparent text.png
in the first case or
text with background.jpg
in the second case). so continue Export open a second window to go up again Export to save the image.
