How to create text with visible borders and transparent characters inside with Gimp, how to save it in PNG or superimpose it on a resized photo
Adding overlay text to an image is one of the most common operations done with graphics programs. When the text is too large and the font family too thick, there is a risk of hiding too large a portion of the photo. One solution is to show text border only.
he then leaves the inside of the characters is transparent that won't hide what's underneath. This customization can be done with
GIMPprogram open source, free AND
installable
about windows, mac AND Linux. The few who didn't
gimp
on the computer you can go to the button
Download [version number]
then choose your operating system link and click on
Download Gimp Directly.
At the time of writing this post the latest version is that
2.10.30. a user windows will download a file in .exe to double-click and follow the installation wizard dialogs. gimp it is the best free alternative to commercial photoshop and in some cases it is even better.
We have already seen, for example, how with gimp they can
merge two photos into transparencyhow can
convert images
in other formats and how to use the plugin
resynthesizer to hide objects from photos.
posted on my
Youtube channel
a tutorial to create text with visible border and with
transparent characters.
he lets himself go gimp then click on
File -> New to open the project configuration window. You define the dimensions (for example, 1920x1080px) and go to +advanced options. Inside fill with you choose the color of the project that can be the one in First floor or that of Bottom once selected in the palette.
he goes up OK to create the project. Then click on the color palette to select how
foreground color one different color that of the project. The tool is selected Text with one click. you choose the font family and the
dimension
characters. Click on the project canvas and yes
write text to create.
Click inside the text rectangle and type Ctrl +
To put select it all.

Above the selected text you will see tools including one for
increase the size and make it occupy the entire project space. Then click on the tool move or you type
M. on the keyboard.
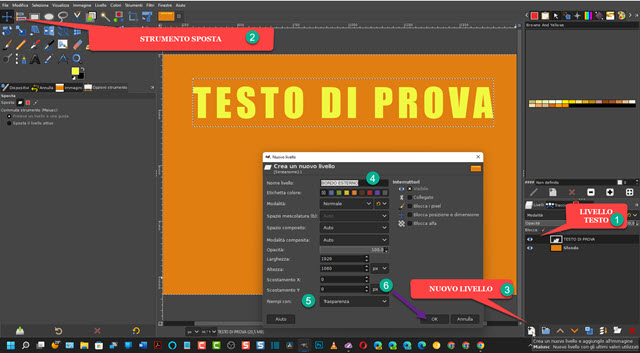
you select the text layer which was automatically created on top of the background so with the tool
move, you put the text where you believe. As
text layer selected, you go up
Create a new layer.

He gives a level name so you choose
Transparency inside fill with and go up
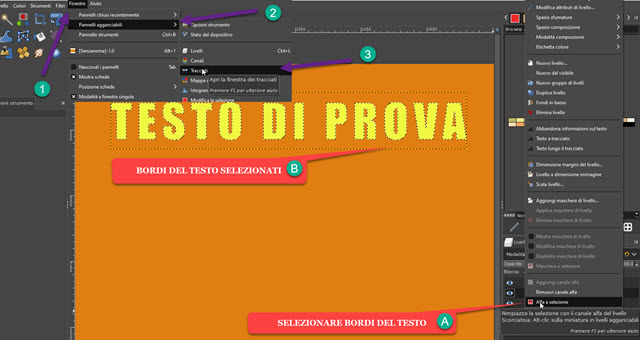
OK. Now select the text layer and click on it with the right mouse button and then go to
alpha to selection per select the text.
O text border. Beside
Layer Panel there must be the
Ways.

If not, you go to the top menu.
Windows -> Dockable Panels -> Paths to view it.
you select the transparent level added then you go to the dashboard tracked and click the button at the bottom
path selection. It will then create a
Selection which will be shown in
path panel.

After creating the selection, you go back to the
Layer Panel and go up
Select -> None
on the menu for Mark off. still enter
path panel and click the button
Draw along the way.
A pop-up window will open in which
set the size in pixels of the border of the path and further down choose style of Linethe default is Custom. Then click on
Treatment.

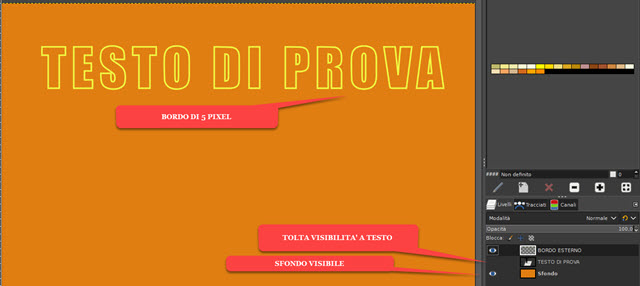
In the screenshot I chose 5 pixels for the border size. The text will then grow 5 pixels in all directions. Back Layer Panel. If you click oneye to remove visibility at the level of test0; only edge that was added. We will then have a text with transparent characters.

The background color will still be present, but
removing visibility even at the level
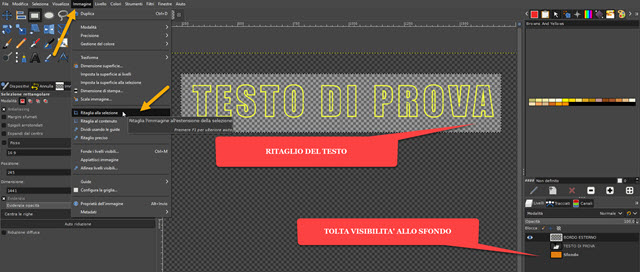
Bottomwe will display only the
text border on transparent background. You can then cut the text by selecting it with the tool
rectangular selection so go up
Image -> Crop to Selection.

This text with transparent characters can be saved by going to
File -> Export As to open a window to choose the destination foldertake a
file name with the relative
extension, physical education
filename.pnggoing up Export so still on
Export in the next window.
Text with blank characters can be pasted over a photo even without exporting it. he goes up File -> Open and select the image to place it. A new tab will be created. Click on the text tab and type Ctrl+C.
copy then you select the photos tab and go up
Ctrl + V. by paste it.

The tool is selected Ladder and click on the pasted text. This will be shown inside a rectangle.
Acting at the central point, we can Replacement the text while, acting with the cursor on the edges and sides, we can
reposition it. click in Ladder to apply the changes. To permanently insert it into the photo and anchor it, access the tool move then click on the photo, externally for the text rectangle.
This image can be saved to JPG going up as usual File -> Export As. In a future article we will see an evolution of this tutorial showing how to create a
wavy and distorted text.
