Record microphone and streaming audio with Ashampoo Audio Recorder for Windows 7, 8, 10, 11. Formats are MP3, WMA, OGG, WAV, FLAC, OPUS, APE
on operating systems windows there is a native application for audio recording. To activate it just go to the button
To startto type Voice recorder
and click on the app of the same name that appears in the search results.
In the lower right corner, you will see a three-dot menu to access the
microphone settings inside
General Windows Settings. To record, click the microphone icon then
to place
break or interrupt. At the end of the registration you can play the file obtained by clicking on the Touch.
In the left column will be shown all the recordings made that can be selected for delete them, play them, rename them or to open the path that by default is this
Documents -> Sound Recorders.
It is a very simple recording system that however has many limitations, such as not being able to choose the output file format or its quality as the sampling rate and the
bitrate.
We've already seen how you can record audio from your microphone and speakers with
Audacity. A possible alternative is that offered by a
ashampoo
which used to be paid, but can now be downloaded and installed for free. The page opens
Free Software by Ashampoo
with 9 standalone products.
Among these is also the one free audio recorder which is a full and free version of the commercial program. Click on the button
Get it now for free to open a page with the program tab.
Click on the button free download to get a file in .exe which to double-click for its installation. Free Ashampoo Audio Recorder is supported by
Windows 7, Windows 8 and Windows 10/11.
I posted on
Youtube channel
a tutorial in which I illustrate how to use this program to
record audio.
after installed free audio recorder you won't be able to use it right away because we will display a popup in the program interface to activate the license. You type our
email address and you go to the button Let's go. On the next screen you type a password and click on activate. A message will be sent to the email address entered using the Click here per
confirm this address.
The license will then be activated and we will be able to use the software forever without limitations. If in addition to free audio recorder if you want to install any of the other free software offered, I suggest you access the portal with your email and password ashampoo. Log in with your credentials and go up
Licenses
in the vertical menu next to your name. You will see the list of programs ashampoo installed with the relative
license keys.
The software is free, but you will receive messages with invitations to purchase the software at the e-mail address provided. ashampoo. To stop receiving them, scroll down to the bottom and click on the link
Cancel subscription. A browser page will open to confirm the
email deletion from newsletter database.
Also after installing free audio recorder and other free programs, in addition to the icon to open the program that will be placed on the desktop, there will also be another shortcut called
Ashampoo offer. It is always advertising, as clicking on it opens a web page. Select it and go up Canc.
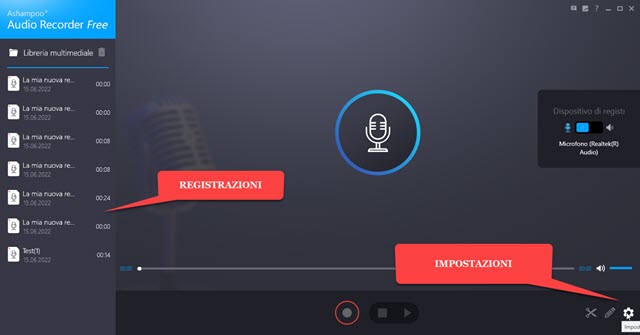
The interface of Free Ashampoo Audio Recorder looks like this:

The last recordings made will be shown in the left column. If this is the first time you've used it, the column will be empty. In the center you will see the microphone button while in the lower right corner are the
Definitions.
Before registering I recommend that you go to the
gear wheel to set your preferences.

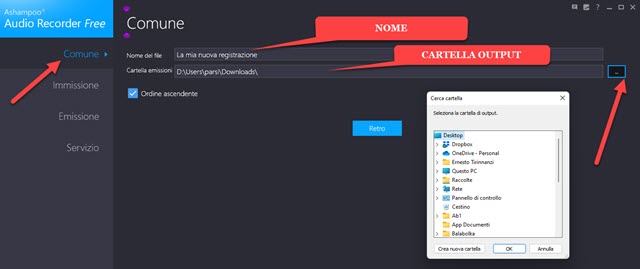
in the first tab Common you can set the
first name of recordings, which is selected by default
My new registration which will receive a number. In the second field you choose the output folder.
Click on the button on the right and choose the folder in which you want to send the recordings. This folder will assume the role of
multimedia library and you can configure it
the order
increasing or decreasing the registers.

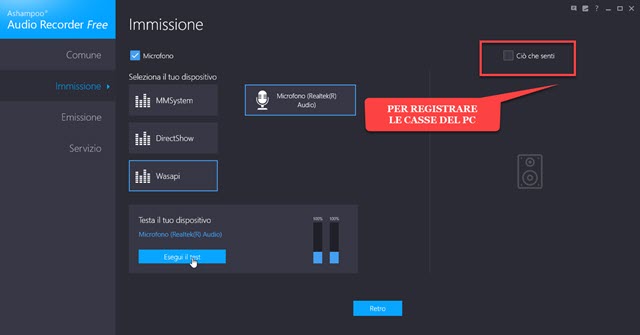
In the card Prohibited configure the
recording input. As in Audacity there are three possible ways:
MMSystem, DirectShow and Wasapi. The last mode is selected by default.
At first, I recommend registering with wasapi selected and possibly try another mode to see if the quality improves. At the top is selected the microphone input and you choose, if we have more than one connected to the computer. Then click on
run the test to check if the program detects it.
so continue stop the test when we verify it If, on the other hand, you verify a What do you feel the speakers will light up and the microphone will no longer be active. with this option
let's record the system audio.

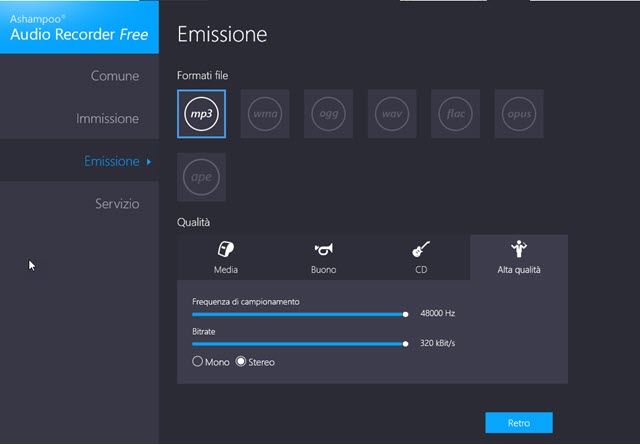
In the card Question let's define
the exit of the program, that is, the output format, choosing it
MP3, WMA, OGG, WAV, FLAC, OPUS
AND BEE. Below you choose the quality of the recorded file that can be Medium, Good, CD or
High quality.
For each choice the Sampling rate and the
bit rate.
The first goes from a minimum of 44100Hz to a maximum of
48000Hz while the second gives a minimum of 128kBit/s to a maximum of 320kBit/s. You can also choose audio mode from Mono or Stereo.
In the card Service there are only advertising links. click in Back or on the program name in the upper left corner to return to the Home page. To start recording, click on the microphone icon or the circle.

To stop recording, click on one of the two icons again. A very serious lack of the program is the
pause recording
which is not present. After starting to record you can go to the button
compact mode to see
a much smaller interface.
You can then return to normal by clicking the appropriate button. The recordings end up in the folder we chose. Yes, they can
reproduce
also with Audio recorder selecting them in the left column and then going to the button Touch. In this case, the start button will also be displayed Break.
If you select a recording and click on the
Pencil
lower right corner if you can change the name.

Interesting is the button cut it, always placed in the lower right corner. If you click on it after selecting a recording, we will be able to configure the sliders to export only an extract that we can also play back. Then go to the floppy disk icons in the lower right corner, respectively, to save the extract or to
save with name.
