How to split video into multiple parts with Shotcut and export all clips taken together into separate files after adding them to playlist
In the previous article we saw how
split and merge videos
with
shotcut. I was under the assumption that when it came to splitting a video and exporting the resulting clips, there might be some faster systems.
In fact, I found one that, in addition to being very simple, is probably the fastest for exporting the clips resulting from splitting the video. Clips can indeed be
exported all together without having to repeat the procedure every time, with considerable time savings. Also in the export procedure we will show en passant how to add clips to the window
Playlistan insertion that could be a harbinger of other uses and in any case particularly interesting and instructive from a heuristic point of view.
I remember this
shotcut
is a free program that can be installed on Windows, Mac and Linuxwhich is updated frequently, which also has an Italian version and which has more intuitive tools than other video editors.
Who hasn't yet
shotcut
on his computer, he can open his newly linked home page and go to
Click to download. Then click on the cross to close the advertising banner and a user Microsoft with
ONLY for 64 bit Will continue
windows installer on one of two mirror sites
fosshub AND GitHubGenericName. A file will be downloaded
.exe to double click. Those who have a
computer for 32 bits you will have to click on the link
older versions and install the old version. On the page that opens, you will have to scroll down until you reach the version
19.12.31 which is the last one that supports ONLY for 32 bits. will then continue Active to be able to download the file
shotcut-win32-191231.exe.
After double clicking on the .exe you follow the
dialog box to complete the program installation.
posted on my
Youtube channel
a tutorial in which I show how to split a video into clips and how to export them.
he lets himself go shotcut then you drag the video to the window Playlist top left.
Later, always by dragging and dropping the cursor, it is added to the
Timeline where a track will be created.

You move the Playhead
(Playback indicator) at the point where you perform the
first cut then click the button
split in playhead or alternatively, you type S. on the keyboard.
Then the Head at the point where you perform the
second cut and so on until
split video into multiple clips.
The next step will consist of adding the clips obtained with the cuts to Playlist.

Yes select one single clip with one click. It will take on a darker color than the others. You go to the button
Copy of, with the classic icon positioned above the
Timeline. In the window Playlist Click on the button More positioned in the lower left corner. The clip that was copied will be added to the Playlist.
The procedure is repeated for the other clips into which the video was divided. Right-click on the starting video.

In the context menu that appears in
Playlist you choose To remove to delete it from the list.
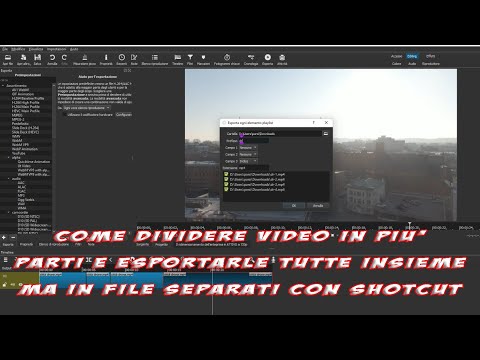
They will then remain at the window just the clips obtained by dividing the video into parts. click in Export.

Inside Presets -> Assortment you go out
Template
to save clips to MP4.
By default in From is selected Timeline. In this case, click the arrow in the menu and choose
Each playlist entry. For this reason the initial video was deleted and now on Playlist there are only the clips where it was split. click in
export file which, however, will not open
Windows File Explorer.
In fact, we will display a window in which to select the
output folder of clips and where to enter the
prefix names. By default it is shown
exports
to save clips with names export-1,
export-2,
etc… We go up OK.
The video encoding process will start and will be shown in the window
Activities top right corner. One video will be encoded at a time without interruption and the user will wait for the end and then view the exported clips.